Kozo Tea Iron

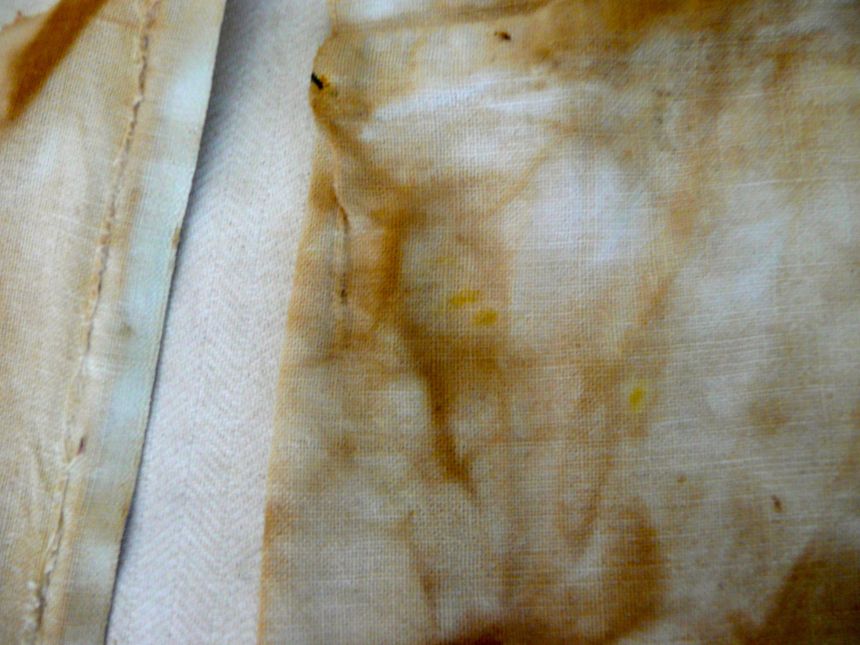
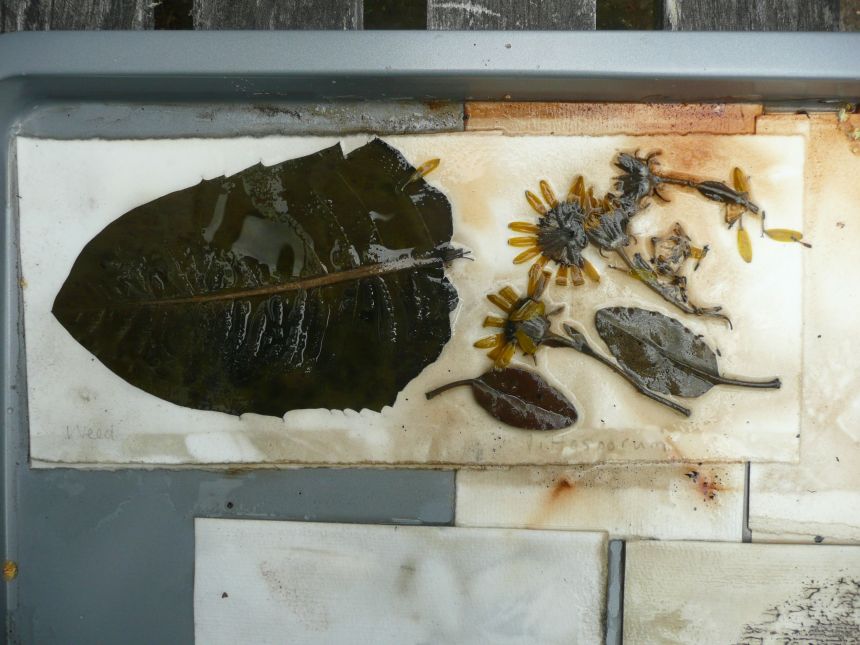
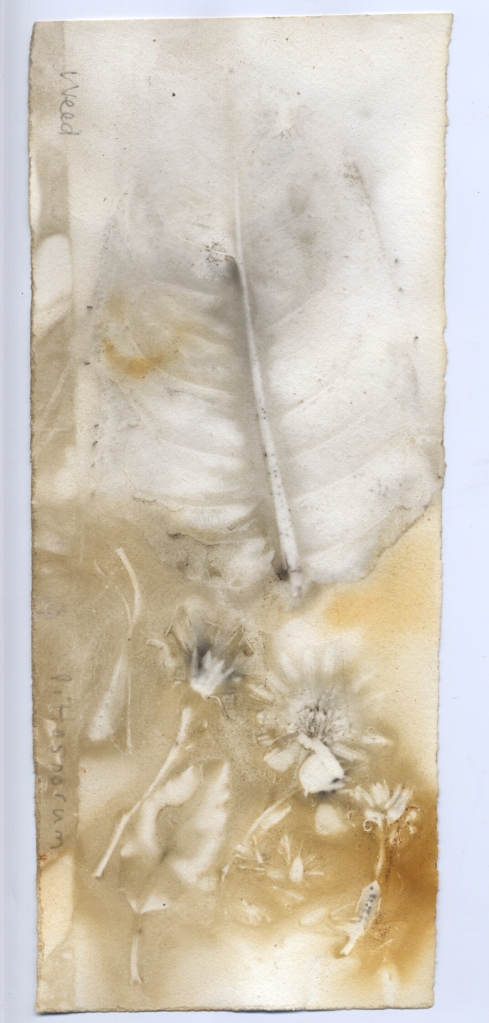
This latest experiment was about getting a contact print through an immersion in a cold dye, in this case tea. I used two strips of dry folded kozo paper that I had previously drawn on with sumi ink;  one piece was held together with a metal bull dog clip.  A stack of dry printmaking paper was interlaid with leaves and seeds,  then sandwiched between two sheets of perspex and clipped together with paper clips.  All three packages were immersed in the tea dye container for a few hours.  The darker dye (caused by the metal clip in the tea) remained in situ around the bundle while the liquid was motionless.  As I removed the papers I could see the reaction of the iron on the tea slowly take place over the rest of the dye and turn it completely black.

The kozo paper was squeezed in the hand when taken out of the tea dye to get the lovely ’embossing’ (the photo does not really do it justice).  I am very pleased with the abstract nature of the results, even though the plant material left little in the way of images on the printmaking paper, but there are some impressions – a trace of the leaves on some sheets.  There are also a few traces of other colours from the plant material.  Some of the seeds left a darker spot on the paper.

There is a tension here (freedom and control) between allowing enough moisture into the stack and the pressure required to achieve images of the plant material.  Perhaps the paper in the stack should have been damp which might have allowed more wicking of the dye.  Needs more investigation.

Some of the tonal variation occurred as the printmaking paper was removed from the stack.  I tried to restrict disturbing the remaining dye but some of this did happen of course!  The printmaking paper has much value as a base layer for further work.


Kozo-and-print-paper

Dyeing Scraps with Tea and Rust

Being a Jill of all trades, I was prompted to have another go with metal and tannin by an article in Wendy Feldberg’s blog Threadborne.  I am switching from researching, to seed collecting, to sewing up clothes and soft furnishings, to printing, to photography, to collecting more rocks for pigments,  to drawing and back again with great rapidity at the moment.  So this dip into dyeing is yet another experiment.  Making the invisible visible through chance.

My intention for this project was to get some pieces of cloth that I could use in my art work.  I had one bath with just the tea and tea bags, and the other with the metal and tannin.  I tried to combine the two dyes, moving some bundles from the tea to the metal bath and leaving part of the bundle above the dye so it was just dipped into the liquid.

The results from the dye session were good, better than expected.  It was a simple process compared to other dye sessions I have done that took much more of my time – or I should say – my presence, watching and checking.  I used some new squares of light weight cotton with a glazed  surface on one side, together with some old sheeting and clothing.   The glazed side accepted the ‘dye’ the same as the unglazed side.  I am thinking I might try printing on this fabric…

Cloths were rolled or folded, then bundled, clipped and tied.  I actually had two dyeing sessions, refreshing the initial brew with more tea, tea bags and vinegar.  The metal was rusty scraps, coins, bulldog clips, an old metal zip, and some aluminium foil (don’t think that did anything) all in a plastic ice cream 1 litre tub. Once out of these cold dye baths – one was overnight, the second one day – the cloths were rinsed, then left for a short while in salty water, then washed with Ecostore hand wash liquid soap that sits in the laundry.  I was very lazy, but really I only had machine washing powder as the other option.  And I felt the hand wash liquid would be softer on the dye.  Anyway, it worked fine.

After drying, the cloths were ironed – once flattened the magic really became apparent.  I included some pink rose petals and leaves in one bundle.  The petals left a pale green colour, and there is a mysterious very pale pink – cannot image where that came from, but it may have been a label that was attached to the plastic mesh bag as it was not from the rose petals.  I included the bag hoping to get an impression of the grid, but that didn’t happen.  I also folded a piece of acid free office computer paper and put that in the second dye bath.


Dyed-brew

Dyed-scraps-overview

Dyed-multi

Dyed-repeat

Dyed-paper

Dyed-scraps-petals

Colours from a Landscape

I am currently showing some pigment colour swatches at the Dunedin Botanic Gardens, and in October I am doing a workshop on making paint.   This exhibition was facilitated through the Blue Oyster Gallery in Dunedin.  Also included in the show are some natural pigments on paper – eco prints – and some raw pigment.  The two artworks on paper show colours from Waikari (green)  and Ashley Gorge (pink and green)  in North Canterbury.  Many thanks to Clare Fraser from the Dunedin Botanic Gardens who is in charge of the venue.  I think the colours look fantastic presented on black paper against the lovely red walls of the Information Centre!

The pigment swatches each show a colour found at a specific location which is named on the swatch.

Image

Appearing below are some of the photos I received from Jaime Hanton, Blue Oyster Gallery, Dunedin, who kindly photographed the show and installed the work for me :

Dunedin Botanics 1

Dunedin Botanics 2

Dunedin botanics 3

Dunedin Botantics 4

This is not my anticipated installation for this show as the initial selection was stolen.  My box was left on the pavement by the courier company and disappeared overnight.  The items in this box were some of those in the photograph shown in the display case, bottom left corner.  If, by any chance, they turn up, I would just love to have them back.  They represent five years research, experiment and recording.  I have given up hope of ever seeing them again, however, and will re-build as much of the information as I can…  Worse things happen, and I ‘count my blessings’.


P1160373


Dunedin Botanics 6

Shells were traditionally used for paint containers!

Autumn colours eco print

I have been trying to catch the autumn leaves before they all blow away!   This post was started a few weeks ago, and I have published others before getting round to finishing this one.

The leaves have been used for eco prints on paper and cloth. I have been using lots of different mordants to soak paper and cotton – alum, washing soda, copper, tannin, gelatine and acorns, both alone and in different combinations.

Here is a collage of the the result on various pieces of cotton fabric, pre soaked for a few days in tannin, alum and washing soda and iron water.  I added iron filings when I put the packages together – was a bit heavy handed – but which produced a beautiful result where they touched Cotinus coggygria leaves.  Leaves used were acer, cotinus, oak, acacia both fresh and frozen, and iris and rose petals.  The fabrics were folded or rolled and weighted down with ceramic tiles.

P1190719

A wood block depicting a pin oak leaf was printed on to Pescia cotton 300 gsm printmaking paper which was later soaked with the cotton fabric. I rolled this paper and some of the fabric in layers around a wood core, using Phormium tenax or harakeke roots in the final layer of cotton. The same leaves were used as in the cotton bundles above, except with the addition of iron filings, vinegar and some Hypericum solar dye bath to which had been added salt and vinegar for a wool and thread dye experiment. My usual over-enthusiasm…

I managed to cram all of this into the steamer – there is a new, larger setup now.

The Pescia paper print, overprinted with cotinus and iron filings at the top and various other leaves below, follows.

Pinoak-print

The reverse of this Pescia paper roll – showing an iris petal and rose petals still attached.

Pinoak-reverse

The winter flowering iris plant that grows in the garden.

Iris

Here the cotton has picked up the green of the iris petal.
Pinoakfabric1

I was delighted with the result on this pre-used cotton poplin type fabric.  A mixture of defined and watery images.  The bias binding has taken up the colour extremely well.  It is an unused, old roll and quite stiff, so I wonder if it is starched.

Pinoakfabric2

Here is another view.  The rusty red came from a pink rose petal.

Pinoakfabric3

Another view of the blue-black colour created by the iron filings.

Cotton-with-iron

Autumn Leaves on Paper and Cloth

I had the opportunity to collect leaves from a friend’s garden. She has the most wonderful collection of shrubs and trees, all good candidates for natural printing.  I made three separate bundles using paper from three different pre-steam soaks.

Pescia 300 gsm paper  was put in a brew of brown rain water and ivy branch and leaves which had collected in a rusty wheelbarrow. The paper was there for nearly three days. Secondly, and for the same amount of time, I placed Fabriano artistico 360 gsm paper, (synthetic) lining fabric and pre-used poplin cotton in another mordant – an alum and washing soda bath.

Thirdly, a piece of white paper was soaked in a rust bath.  As usual the planned method of preparation flew out the door when I then added a little of the rusty water from this water + vinegar and iron objects on to the lining fabric which was on top of the second soaking pile.

All the leaves were from the freezer. The full sheet of Pescia paper I folded to fit the steamer, as I wanted a large complete sheet for a project that is part of a forthcoming group show. Into the rolled paper and fabric from the alum bath, I put more of the same leaves and bound them up with unmordanted wide cotton bias binding at which point I introduced some dried harakeke roots (NZ flax plant, Phormium cultivars).  The image below shows these two  bundles in the steamer.

Darfield15

Below is the alum Fabriano paper on its cylindrical cardboard core again.  I make sure I roll the wet paper and leaves tightly when rolling up the bundle.  I do find the bias binding works well.

Darfield4

Unwinding this bundle.  It contained vine leaves, cotinus, acer, maple, sycamore and other deciduous leaves – I have to consult the owner about the more unusual plants…  The vine leaves were a glorious blend of reds, greys and black, so I was interested to see the quite stunning result – for me at least!

Darfield3

Another view of this bundle of two sheets of paper – it is the left hand side of the image above, the vine leaf removed.  Some of the vine leaf is still stuck to the paper.  It was removed when dry.

Darfield2

This is a further image of the still wet papers.

Darfield1

I particularly  like the shape of this leaf, which I think is from a tulip tree – Liriodendron.

Darfield6

Here is the lining fabric and the cotton bias binding from the rust paper print.  (If you sew, you will know what that is!)

Darfield5

All the above image are when the material was wet.   So today I photographed the dried and ironed fabric.  Immediately below is the lining fabric, and another image of the same piece.  When I iron the fabric I like to keep the embossing from the leaf veins.

Darfield7

Darfield8

The definition of the leaves is a lovely instance of chance – the darker areas behind the leaf giving the appearance of depth.

Finally, below is the cotton fabric from the alum and washing soda mordant bath: the leaf shapes not distinct.

Darfield9

The tannin bath print (two images below) was not so spectacular as the ones from the alum bath; but still quite subtle.  The definition on the printing paper – Pescia (56 x 76 cms | 22 x 30 inches) – is not so good, but I think there was not enough pressure on the package even though it was well weighted down.  I wonder if the one hour steam was too long, so I will experiment with a shorter one.  It is almost as if there is too much water accumulating between the sheets of paper.  I may have soaked the paper for too long as well.  I should try taking off the excess water by pressing between sheets of butchers paper before laying on the plant material (as you do when printing).  This image was taken when the paper was dry.

Darfield10

This is the ‘back’ below.  I do to know why it is so very mono-colour, but possibly the absence of the vine leaves explains this.  And the alum which always seems to give a yellow/green cast to the colour range.

Darfield11

Here are other papers from this steam.  This is the third bundle, bound with bias binding.  The outer paper was the rust print.

Darfield16

In the photo below, the paper with the oil based ink dry point (to the right)  was included in the tannin bath.  All papers are dry.

Darfield14

I have to say, my rust prints are very rusty.  For a couple of days nothing seems to happen, then there is more rust than I would like the next day.  This is what I mean.  This is the other side of the paper above – and the leaf print is very black!

Darfield13

The top sheet of paper here has some lovely, abstract detail.

Darfield12

This was an exciting outcome for me.  I just love this process.  Many thanks to Faye and Dave Marshall for providing the leaves.

Solar dyeing – Hypericum

For one of my first solar dyeing experiments, I used St Johns Wort, Hypericum, from the garden. My plant is one of the many varieties of Hypericum.

St Johns Wort flower

On 6 January I placed the buds, leaves and flowers separately in three glass jars, filled with tap water (Oxford bore) and placed a weight on the top to keep the unmordanted cotton cloths submerged.

The following image is the dyed, scrunched up cotton from the jar that contained buds and two stones, one of which must have had a generous amount of iron in it as it introduced a black colour.

Hypericum buds

The resulting green, blue and black was very nice to see.  The cotton from this and the next jar was removed on 17 January.

The jar with the chopped up hypericum leaves contained a Waimakariri river stone to weigh down the leaves and three folded and tied cotton bundles with different contents.  In the photograph below, the top scrap of cotton was folded on its own.  The lower scrap enclosed more hypericum leaves and some Acacia melanoxylon bark.  The leaves in this bundle came through as a pale green-yellow, just visible in the image.  The thin strip on the right is 300 gsm Fabriano paper, folded and placed in the jar with the bundles.

Hypericum leaves

The third bundle containing flower buds is below.  The yellow buds did not seem to change the colour; I do not know where the grey marks came from!  Interesting that the iron caused such a different colour to appear in the first jar.

Hypericum

The third jar containing hypericum flowers and a piece of wire that I thought was copper was left until 28 January when I removed the cotton.  Some brighter traces of yellow appear, perhaps through contact with the wire.

Hypericum copper

On 19 January I started to record my solar dyeing tests and to date I have 35 of them.  No wonder I have not had a chance  to sit down at the computer.  The weather has been hot and mostly dry for about three weeks,  even now at 5.51 pm it is 27 degrees C in the studio (built as a greenhouse).  I recorded 47 degrees C one day on the shelf by the windows were I place my solar dye jars.  The garden is full of flowers and I could certainly never need to go out further afield in search of material for dyeing. I hardly know where to start.  I would prefer to concentrate on New Zealand native plants and have solar dyed with Harakeke the New Zealand flax plant – Phormium cookianum; Griselinea littorals; Hebe; and Wineberry – Aristotelia serrata.

I have been reading Richard Mabey’s book Weeds; How Vagabond Plants Gatecrashed Civilisation and Changed the Way We Think About Nature, published in 2010.  Chance and serendipity are rife here at the moment – I found this book in the library by chance – and I was also concurrently very curious about a weed that was new to me.  I eventually found this plant on the internet by using the search terms ‘tiny white flower weed’.  The plant is called Galinsoga parviflora and has the common names of Gallant Soldier or Potato Weed.  Well, it is growing in the vegie patch and appeared last season – near the potatoes.  Then I discover from the Contents that Mabey’s book  has a chapter entitled Gallant-soldier!   It so happens that this plant, a member of the daisy family, arrived at Kew Gardens in 1793 from Peru and was named after the ‘splendidly ennobled’ Spanish botanist Don Mariano Martinez de Galinsoga.  This plant has the tiny-est flower I have ever seen.  It escaped Kew Gardens in the 1860s and eventually found its way to my garden.

Another serendipitous moment arrived when I read in this book that in 1748 ‘a celebrated [British agricultural] improver,  William Ellis, who farmed at Little Gaddesden in the Chilterns […] was experimenting with different methods of weed control and pasture management’.  Ellis used clover as an effective way of controlling weeds. This nitrogenous crop could be ploughed in so was also a great cost saver as hand weeding would not be required.  I expect my ancestors from Little Gaddesden took to straw-plaiting to supplement their incomes, no longer being required to weed the Corn (wheat) fields.  Actually, we have also used clover as a weed suppressant – we have a bricked area that we despaired of – after two years hand weeding between the  bricks we once tried the chemical way but not really wanting to do this gave that idea up pretty fast (and it didn’t work really for the weeds came back quickly).  We finally decided to just mow it!  It works wonderfully, and is a haven for the bees as the clover is taking over.

Much to my comfort, Mabey also talks about Hypericum perforatum.  “Each leaf is covered in tiny transparent dots (the perforations of the Latin name…) and held up against the sky the sun’s rays prick through, like dapple in a springtime wood.”  A good connection with embroidery there…

This is miles away from eco-print and solar dyeing… and the dye from Galinsoga is a pale straw colour.

Eco Printing on Paper

As part of a series of tests for printing plant colour on paper, I put paper and eucalyptus and hoheria leaves in between two pieces of paper in an ice cream tub, added water and laid a ceramic tile and stone on the top to submerge the contents.

Eucalyptus on paper

Tub and contents prior to soaking.Tub

Plant prints on paper

As it is 1st January 2013, and I am having a ‘holiday’ today, thought I would start the year with a post. These are some of my recent experiments on printing plant images and colours on paper (360 gsm watercolour paper).

I used diluted vinegar and a few pieces of rusty iron and layered plants and paper, weighted it all down with some of my rock collection and w a i t e d. I made sure the paper was damp – well quite wet really!

Here are the before and after images.  The before being before I took the leaves and flowers off the paper. The first two images show part of a dock leaf and pittosporum flowers and leaves. Not much transfer of plant colour.

Dock leaf and pittosporum leaves and flowers

Dock leaf and pittosporum flowers

The next two images are of lemon balm leaves, aquilegia flowers and another unidentified leaf (plant has a beautiful blue flower ‘cone’  see below).  The plant material was pressed between a folded piece of paper.  Some of the plant colour from the aquilegia has transferred to the paper (see the left hand impression).  These are, to me, ghosting images, formed by the plant material resisting the water which has been coloured by the rust and the dust off the stones weighing the paper down.  They are delicate images and I was really pleased with them as some of my first attempts.  I now have India Flint’s book, Eco Colour, so now that the Christmas season is over I will be able to concentrate on eco printing – well, in between all the other household duties…  And, my freezer has found a new raison d’être!

I wish everyone a bountiful and successful 2013.

Lemon balm leaves, aquilegia flowers

Lemon balm and  aquilegia

Now follows an image of the blue flowered bush – if anyone knows what it is, please let me know!  I used one of the pointed leaves.

Blue flowered plant